How To Create OpenAI DALL·E Mask Images
How To Create OpenAI DALL·E Mask Images
If you are starting to work with the OpenAI image edit API, you will need some tools to create the mask image. This mask image contains erased pixels where the AI should draw new content.
Open AI Image Requirements
- Image must have transparent masking added
- Less than 4MB in size
- Aspect ratio 1:1 (square)
- PNG image format
Creating the mask image
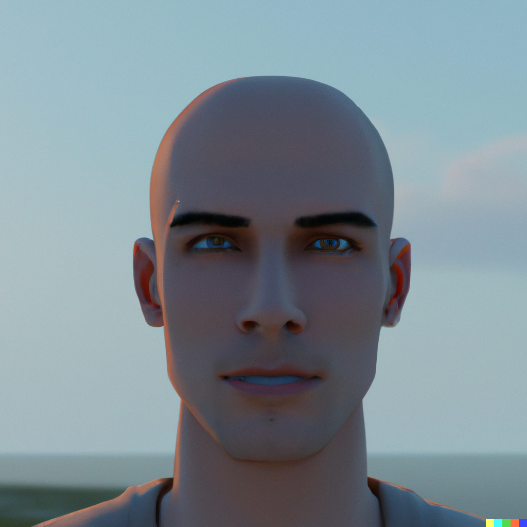
First start with an image you want to edit and an idea of what you want to change about the image. In this example we will be adding a baseball cap to the image. This image was generated using text to image with Open AI and is about 527x527 pixels.

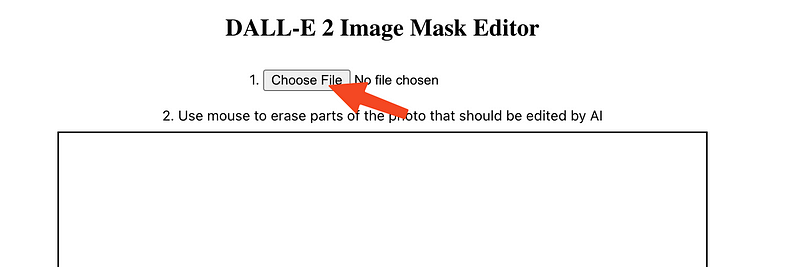
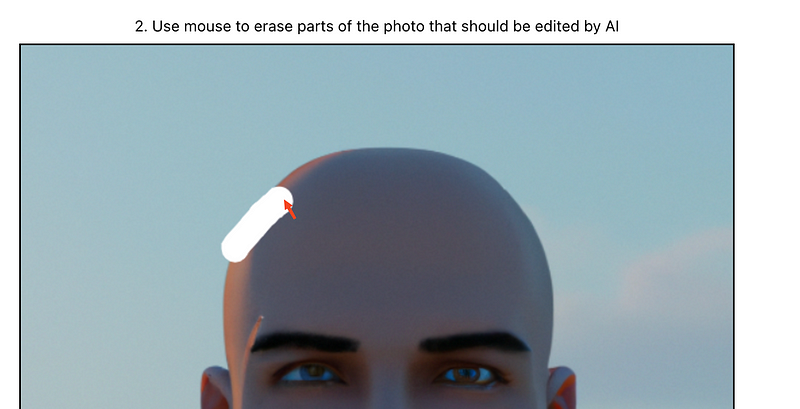
Next we want to remove pixels from the image where we want to AI to draw the baseball cap. Many tools can do this work, but to speed up the process, I created a simple website. Visit the site below to create your mask image.
https://ai-image-editor.netlify.app/

Choose the image you want to edit using the Choose File button.

Erase the part of the photo you want to be changed.

Save both the original and the mask image.
Now that you have the images needed for you image editing, we can come up with the prompt we will use to let the AI know what we want it to draw.
Draw baseball cap
Add baseball cap to image
Put front facing baseball cap on head of person in
                          image
These are a few examples of prompts that could be used to generate an image edit. Now we can send the API request to get our AI generated edit back.
response = openai.Image.create_edit(
  image=open("original.png", "rb"),
  mask=open("mask.png", "rb"),
  prompt="Put front facing baseball cap on head of person in image",
  n=1,
  size="1024x1024"
)
image_url = response['data'][0]['url']
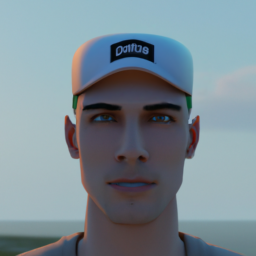
You will get something like this returned from the API.

Now you can change the prompt and see what other types of edits you can generate.
Mask Editor Code
Interested in making your own AI image editor? Here is the code used to remove pixels from an image to get you started.
import { useState } from 'react'
import { StatusBar } from 'expo-status-bar';
import { StyleSheet, Text, View, Button } from 'react-native';
const Separator = () => <View style={styles.separator} />;

export default function App() {
  const [originalImage, setOriginalImage] = useState('')

  const fileSelected = (event) => {
    const file = event.target.files[0]
    const img = new Image()
    img.src = URL.createObjectURL(file)
    img.onload = () => {
      if (img.width !== img.height) {
        const minVal = Math.min(img.width, img.height)
        setup(img, 0, 0, minVal, minVal)
      } else {
        setup(img, 0, 0, img.width, img.height)
      }
    }
  }

  const setup = (img, x, y, width, height) => {
    const node = document.getElementById("PictureLayer");
    if (node && node.parentNode) {
      node.parentNode.removeChild(node);
    }

    var can = document.createElement('canvas');
    can.id = "PictureLayer"
    can.width = window.innerWidth * 0.45
    can.height = window.innerWidth * 0.45
    can.style = 'margin:auto;'
    const outerCanvas = document.getElementById('outer-canvas')
    outerCanvas.appendChild(can)

    var ctx = can.getContext("2d")
    ctx.drawImage(img, x, y, width, height, 0, 0, can.width, can.height);
    ctx.lineCap = "round";
    ctx.lineWidth = 25;
    ctx.globalCompositeOperation = 'destination-out'
    let isDrawing = false

    const startDrawing = (event) => {
      isDrawing = true
      const pos = getPos(event)
      console.log('start erasing', pos)
      points.setStart(pos.x, pos.y)
    }
    const stopDrawing = () => {
      console.log('stop erasing')
      isDrawing = false
    }
    const draw = (event) => {
      if (!isDrawing) return
      const pos = getPos(event)
      points.newPoint(pos.x, pos.y)
    }

    var points = function() {
      var queue = [], qi = 0;

      function clear() {
        queue = [];
        qi = 0;
      }

      function setStart(x, y) {
        clear();
        newPoint(x, y);
      }

      function newPoint(x, y) {
        queue.push([x, y]);
      }

      function tick() {
        var k = 20; // adjust to limit points drawn per cycle
        if (queue.length - qi > 1) {
          ctx.beginPath();
          if (qi === 0)
            ctx.moveTo(queue[0][0], queue[0][1]);
          else
            ctx.moveTo(queue[qi - 1][0], queue[qi - 1][1]);

          for (++qi; --k >= 0 && qi < queue.length; ++qi) {
            ctx.lineTo(queue[qi][0], queue[qi][1]);
          }
          ctx.stroke();
        }
      }

      setInterval(tick, 50); // adjust cycle time

      return {
        setStart: setStart,
        newPoint: newPoint
      };
    }()

    window.addEventListener("touchstart", startDrawing)
    window.addEventListener("mouseup", stopDrawing)
    can.addEventListener("touchend", stopDrawing)
    can.addEventListener("mousedown", startDrawing)
    can.addEventListener("mousemove", draw)
    can.addEventListener("touchmove", draw)

    function getPos(e) {
      var rect = can.getBoundingClientRect();
      if (e.touches) {
        return { x: e.touches[0].clientX - rect.left, y: e.touches[0].clientY - rect.top }
      }
      return { x: e.clientX - rect.left, y: e.clientY - rect.top }
    }
    setOriginalImage(can.toDataURL())
  }

  const downloadOriginal = () => {
    console.log('download original')
    const node = document.getElementById("PictureLayer")
    if (!node) return
    var link = document.createElement('a')
    link.download = 'original.png'
    link.href = originalImage
    link.click()
  }

  const downloadMask = () => {
    console.log('download mask')
    const node = document.getElementById("PictureLayer")
    if (!node) return
    var link = document.createElement('a')
    link.download = 'mask.png'
    link.href = node.toDataURL()
    link.click()
  }

  return (
    <View style={styles.container}>
      <h2 style={styles.title}>DALL-E 2 Image Mask Editor</h2>
      <Text style={styles.title}>1. <input type="file" accept="image/*" onChange={fileSelected} /></Text>
      <View>
        <Text style={styles.title}>2. Use mouse to erase parts of the photo that should be edited by AI</Text>
        <div style={styles.outerCanvas} id='outer-canvas' />
      </View>
      <View>
        <Text style={styles.title}>3. Download Images</Text>
        <View style={styles.buttonContainer}>
          <Button style={{ margin: 10 }} title='Download Original' onPress={downloadOriginal} />
        </View>
        <View style={styles.buttonContainer}>
          <Button style={{ margin: 10 }} title='Download Mask' onPress={downloadMask} />
        </View>
      </View>
      <StatusBar style="auto" />
    </View>
  );
}

const styles = StyleSheet.create({
  container: {
    flex: 1,
    backgroundColor: '#fff',
    alignItems: 'center',
    justifyContent: 'center',
  },
  separator: {
    marginVertical: 8,
    borderBottomColor: '#737373',
    borderBottomWidth: StyleSheet.hairlineWidth,
  },
  title: {
    textAlign: 'center',
    marginVertical: 8,
  },
  fixToText: {
    flexDirection: 'row',
    justifyContent: 'space-between',
  },
  outerCanvas: {
    width: window.innerWidth * 0.45,
    height: window.innerWidth * 0.45,
    borderStyle: 'solid'
  },
  buttonContainer: {
    marginVertical: 8
  }
});
Thank you for reading! Stay tuned for more.